|
|
Using the JFC/Swing Packages |
With theJTableclass, you can display tables of data, optionally allowing the user to edit the data.
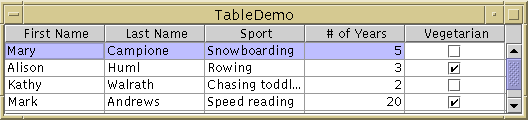
JTabledoesn't contain or cache data; it's simply a view of your data. Here's a picture of a typical table displayed within a scroll pane:[PENDING: Label these parts: each cell displays an item of data; the column header displays the column name]This section tells you how to accomplish some common table-related tasks. Because
Note: The code for putting a table in a scroll pane differs between Swing 1.0.1 and Swing 1.0.2. Here are the ways to write the code://1.0.1 code (causes deprecation warning in 1.0.2): JScrollPane scrollPane = JTable.createScrollPaneForTable(table);//1.0.2 code (causes missing column headers in 1.0.1): JScrollPane scrollPane = new JScrollPane(table);
JTablehas too many features to be completely described in this tutorial, please periodically search The Swing Connection for pointers to other table documentation. Here are the tasks this section discusses:
- Creating a simple table
- Creating a data model
- Setting column widths
- Sorting and otherwise manipulating data
- Customizing the display and event handling
- The table API
Creating a Simple Table
Here is the code that implements the table in
Try this:
- Compile and run SimpleTableDemo. The source file is
SimpleTableDemo.java.
See Getting Started with Swing if you need help.- Click the cell that contains "Snowboarding".
The entire first row is selected, indicating that you have selected Mary Campione's data. If you don't want row selection, you can specify a different selection model using theJTablesetCellSelectionEnabledorsetColumnSelectionAllowedmethod. A special highlight indicates that the "Snowboarding" cell is editable. Generally, you begin editing a text cell by double-clicking it.- Position the cursor over the "First Name" heading. Now press the mouse button and drag the heading to the right.
As you can see, users can rearrange columns in tables.- Position the cursor just to the right of a heading. Now press the mouse button and drag to the right or left.
The column changes size, and the other columns adjust to fill the remaining space.- Resize the window containing the table so that it's bigger than necessary to display the whole table.
All the table cells become larger, expanding to fill the extra space.
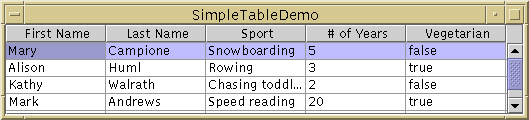
SimpleTableDemo.java:The SimpleTableDemo example uses one of twoObject[][] data = { {"Mary", "Campione", "Snowboarding", new Integer(5), new Boolean(false)}, {"Alison", "Huml", "Rowing", new Integer(3), new Boolean(true)}, {"Kathy", "Walrath", "Chasing toddlers", new Integer(2), new Boolean(false)}, {"Mark", "Andrews", "Speed reading", new Integer(20), new Boolean(true)}, {"Angela", "Lih", "Teaching high school", new Integer(4), new Boolean(false)} }; String[] columnNames = {"First Name", "Last Name", "Sport", "# of Years", "Vegetarian"}; final JTable table = new JTable(data, columnNames); table.setPreferredScrollableViewportSize(new Dimension(500, 70)); //Create the scroll pane and add the table to it. JScrollPane scrollPane = new JScrollPane(table);JTableconstructors that directly accept data:The advantage of using one of these constructors is that it's easy. However, these constructors also have disadvantages:
JTable(Object[][] rowData, Object[] columnNames)JTable(Vector rowData, Vector columnNames)If you want to get around these restrictions, you need to implement your own data model.
- They automatically make every cell editable.
- They treat all data types the same. For example, if a table column has
Booleandata, the table can display the data in a check box. However, if you use one of the data-acceptingJTableconstructors, yourBooleandata will be displayed as a String. You can see this difference in the last column of the two previous pictures of tables.- They require that you put all of the table's data in the array or vector, which isn't appropriate for some data. For example, if you're reading data from a large database, then you almost certainly don't want to read the whole database and store it in an array or vector.
- [PENDING: what else?]
Creating a Data Model
As the following figure shows, every table gets its data from an object that implements theTableModel[data model (TableModel)] --> [JTable][PENDING: make that a real figure]Here's the code that the
JTable(final Object[][] rowData,
final Object[] columnNames)
constructor uses to create its data model:As the preceding code shows, implementing a data model can be simple. Generally, you implement your data model in a subclass of thethis(new AbstractTableModel() { public String getColumnName(int col) { return columnNames[col].toString(); } public int getRowCount() { return rowData.length; } public int getColumnCount() { return columnNames.length; } public Object getValueAt(int row, int col) { return rowData[row][col]; } public boolean isCellEditable(int row, int col) { return true; } public void setValueAt(Object value, int row, int col) { rowData[row][col] = value; } });AbstractTableModelYour model might hold its data in an array, vector, or hashtable, or it might get the data from an outside source such as a database. It might even generate the data at execution time. For examples of getting data from a database, see the
examples/Tabledirectory in the Swing release.Some tables simply display static data; they're neither editable nor changeable. Many tables, however, let the user interactively edit the data. In some tables, the data can be changed in other ways. For example, in a table that displays files, another application might create a file, and the table display would need to be updated to add the file.
If data values change except by the user editing the table, the data model must let the
JTableknow by firing a table-changed event.AbstractTableModelfireXxxxmethods, which make it easy to create and fire table-changed events. TheJTablelistens for table-changed events from its data model; when it detects one, it displays the changed data.Here again is a picture of a table implemented by TableDemo, which has a custom data model:
This table is different from the SimpleTableDemo table in the following ways:
- SimpleTableDemo's data model, having been created automatically by
JTable, isn't smart enough to know that the # of Years column contains numbers (which should generally be right aligned). It also doesn't know that the Vegetarian column contains boolean values, which can be represented by check boxes. TableDemo's custom data model, even though it's simple, can easily determine the data's type, helping theJTabledisplay the data in the best format.- In SimpleTableDemo, all cells are editable. In TableDemo, we implemented the custom data model so that it doesn't let you edit the name columns; it does, however, let you edit the other columns.
Below is the code from
TableDemo.javathat is different from the code inSimpleTableDemo.java. Bold font indicates the code that makes this table's model different from the table model defined automatically in SimpleTableDemo. [PENDING: modify this code]public TableDemo() { ... MyTableModel myModel = new MyTableModel(); JTable table = new JTable(myModel); table.setPreferredScrollableViewportSize(new Dimension(500, 70)); //Create the scroll pane and add the table to it. JScrollPane scrollPane = new JScrollPane(table); //Add the scroll pane to this window. setContentPane(scrollPane); ... } class MyTableModel extends AbstractTableModel { final String[] columnNames = ...//same as before... final Object[][] data = ...//same as before... public int getColumnCount() { return columnNames.length; } public int getRowCount() { return data.length; } public String getColumnName(int col) { return columnNames[col]; } public Object getValueAt(int row, int col) { return data[row][col]; } /* The default version of this works OK; this is nicer. */ public Class getColumnClass(int c) { return getValueAt(0, c).getClass(); } /* * Don't need to implement this method unless your table's * editable. */ public boolean isCellEditable(int row, int col) { //Note that the data/cell address is constant, //no matter where the cell appears onscreen. if (col < 2) { return false; } else { return true; } } /* * Don't need to implement this method unless your table's * data can change. */ public void setValueAt(Object value, int row, int col) { ...//debugging code not shown... if (data[0][col] instanceof Integer) { //If we don't do something like this, the column //switches to contain Strings. try { data[row][col] = new Integer((String)value); } catch (NumberFormatException e) { ...//handle the user's bad entry... } } else { data[row][col] = value; } ...//debugging code not shown... } ...Setting Column Widths
By default, every column in a table has equal width, and the columns' width automatically fills the available display space. If your table is in aJScrollPane, then you can specify the width of the table using theJTablesetPreferredScrollableViewportSizemethod. Each column starts out 75 pixels wide, by default.To customize column widths while retaining auto-resizing of all columns in the table, you can invoke
setMinWidthon each of your table's columns. This sets both the minimum width of each column and their approximate relative widths. For example, adding the following code to TableDemo makes its third column approximately twice as big as its other columns:// Implementing a flexible-width table. TableColumn column = null; for (int i = 0; i < 5; i++) { column = table.getColumnModel().getColumn(i); if (i == 2) { column.setMinWidth(100); //sport column is bigger } else { column.setMinWidth(50); } }
Note: If you usesetMinWidth, be sure to invoke it on every column. Otherwise, the columns without a minimum width will be very thin.
As the preceding code shows, each column in a table is represented by a
TableColumnsetMinWidth,TableColumnalso supplies methods for getting/setting the maximum width and current width of a column, and for getting the components used to draw the column header and cells. For an example of setting cell widths based on the actual amount of space needed to draw the cells' contents, see theinitColumnSizesmethod inTableRenderDemo.java, which is discussed in Customizing the Display and Event Handling.To make a fixed-width table, turn auto-resizing off and use the
setWidthto set the width of every column. If the table is in a scroll pane, be sure to set the table's preferred scrollable viewport width to be no more than the sum of its columns' widths, or else you'll get white space at the right edge of the table. For example:// Implementing a fixed-width table. table.setPreferredScrollableViewportSize(new Dimension(425, 50)); table.setAutoResizeMode(JTable.AUTO_RESIZE_OFF); for (int i = 0; i < 5; i++) { column = table.getColumnModel().getColumn(i); if (i == 2) { column.setWidth(125); //sport column is bigger } else { column.setWidth(75); } }Sorting and Otherwise Manipulating Data
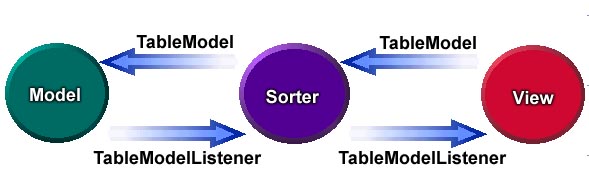
To perform data manipulation such as sorting, you can use one or more specialized table models (data manipulators), in addition to the table model that provides the data (the data model). The data manipulators should sit between the table and the data model, as the following picture shows:You can use theTableMapandTableSorterclasses when implementing your data manipulator.TableMapimplementsTableModeland serves as a superclass for data manipulators.TableSorteris aTableMapsubclass that sorts the data provided by another table model. You can either change these classes, using them as a basis for writing your own data manipulator, or use the classes as-is to provide sorting functionality.To implement sorting with
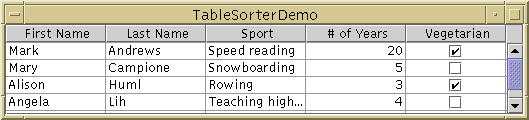
TableSort, you need just three lines of code. The following listing shows the differences between TableDemo and its sorting cousin, TableSorterDemo.TheTableSorter sorter = new TableSorter(myModel); //ADDED THIS //JTable table = new JTable(myModel); //OLD JTable table = new JTable(sorter); //NEW sorter.addMouseListenerToHeaderInTable(table); //ADDED THISaddMouseListenerToHeaderInTablemethod adds a mouse listener that detects clicks over the column headers. When the listener detects a click, it sorts the rows based on the clicked column. For example, when you click "Last Name", then the rows are reordered so that the row with "Andrews" becomes the first row. When you Shift-click a column header, the rows are sorted in reverse order.Customizing the Display and Event Handling
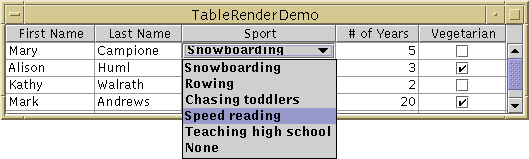
You've already seen how you can change which kind of component displays and edits your data just by specifying the type of data. For example, if you specify that a cell containsBooleandata, then the table renders it (and lets the user edit it, if appropriate) using a check box. If the default renderers and editors aren't exactly what you need, you can customize them.The following picture shows an application (
TableRenderDemo.java) that adds custom renderers and editors to TableDemo.The figure shows that the Sport cells are edited with a combo box instead of a text field. What the figure doesn't show is that both the Sport column header and all of the Sport cells have tool tips.Before telling you how to get and set renderers and editors, you should understand how tables display their data. You might expect each cell in a table to be a component. However, for performance reasons, Swing tables aren't implemented that way. Instead, each column uses a single renderer to draw every cell in the column. For cells in the column that are editable, the table uses a single editor. Renderers and editors are often shared by multiple columns.
For example, for
Objectdata in a table, the default renderer is aJLabeland the default editor is aJTextField. If the table contains onlyObjectdata, then a singleJLabeldisplays all the cells, and a singleJTextFieldis used to edit all editable cells.To make a specific component the editor for all the cells in a column, use the
setCellEditormethod ofTableColumn. To customize the existing renderer for a column, you need to get or create the default renderers for the column's header and cells, and then use thesetToolTipTextmethod of the renderer's component.Here is the code that
TableRenderDemoadds toTableDemoto set its renderers and editors:Here is the code that TableRenderDemo uses to size its columns. For each column, the code gets the components used to render that column's header and cells. It then asks the components how much space they need. Finally, it uses the space information to set the column's width.//Set up the editor for the sport cells. JComboBox comboBox = new JComboBox(); comboBox.addItem("Snowboarding"); comboBox.addItem("Rowing"); comboBox.addItem("Chasing toddlers"); comboBox.addItem("Speed reading"); comboBox.addItem("Teaching high school"); comboBox.addItem("None"); sportColumn.setCellEditor(new DefaultCellEditor(comboBox)); //Set up tool tips for the sport cells. DefaultTableCellRenderer renderer = new DefaultTableCellRenderer(); renderer.setToolTipText("Click for combo box"); sportColumn.setCellRenderer(renderer); //Set up tool tip for the sport column header. TableCellRenderer headerRenderer = sportColumn.getHeaderRenderer(); if (headerRenderer instanceof DefaultTableCellRenderer) { ((DefaultTableCellRenderer)headerRenderer).setToolTipText( "Click the sport to see a list of choices"); }TableColumn column = null; Component comp = null; int headerWidth = 0; int cellWidth = 0; Object[] longValues = model.longValues; for (int i = 0; i < 5; i++) { column = table.getColumnModel().getColumn(i); comp = column.getHeaderRenderer(). getTableCellRendererComponent( null, column.getHeaderValue(), false, false, 0, 0); headerWidth = comp.getPreferredSize().width; comp = table.getDefaultRenderer(model.getColumnClass(i)). getTableCellRendererComponent( table, longValues[i], false, false, 0, i); cellWidth = comp.getPreferredSize().width; ...//debugging code not shown... column.setMinWidth(Math.max(headerWidth, cellWidth)); } ...//In the model: public final Object[] longValues = {"Angela", "Andrews", "Teaching high school", new Integer(20), Boolean.TRUE};The Table API
[PENDING: put API tables here]
|
|
Using the JFC/Swing Packages |